
Brick Stitch Beading Pattern Paper: How to Choose and Design Your Grid
Plan brick stitch on offset graph paper instead of square grids. Match cell width and height to Delica or seed beads, pick a layout for earrings or patches, and print templates at actual size.
Tip: For Miyuki Delica 11/0 beads, set cells slightly wider than tall—not perfect squares—for the most accurate preview.
Understanding the Brick Stitch Grid
In bead weaving and jewelry design, planning on paper before you stitch is essential. Brick stitch arranges beads like staggered bricks: each row sits halfway between the beads in the row above or below. Thread path and visual rhythm both depend on that half-bead offset. If the paper does not show it, the drawing and the finished piece will disagree about where edges, holes, and color changes fall.
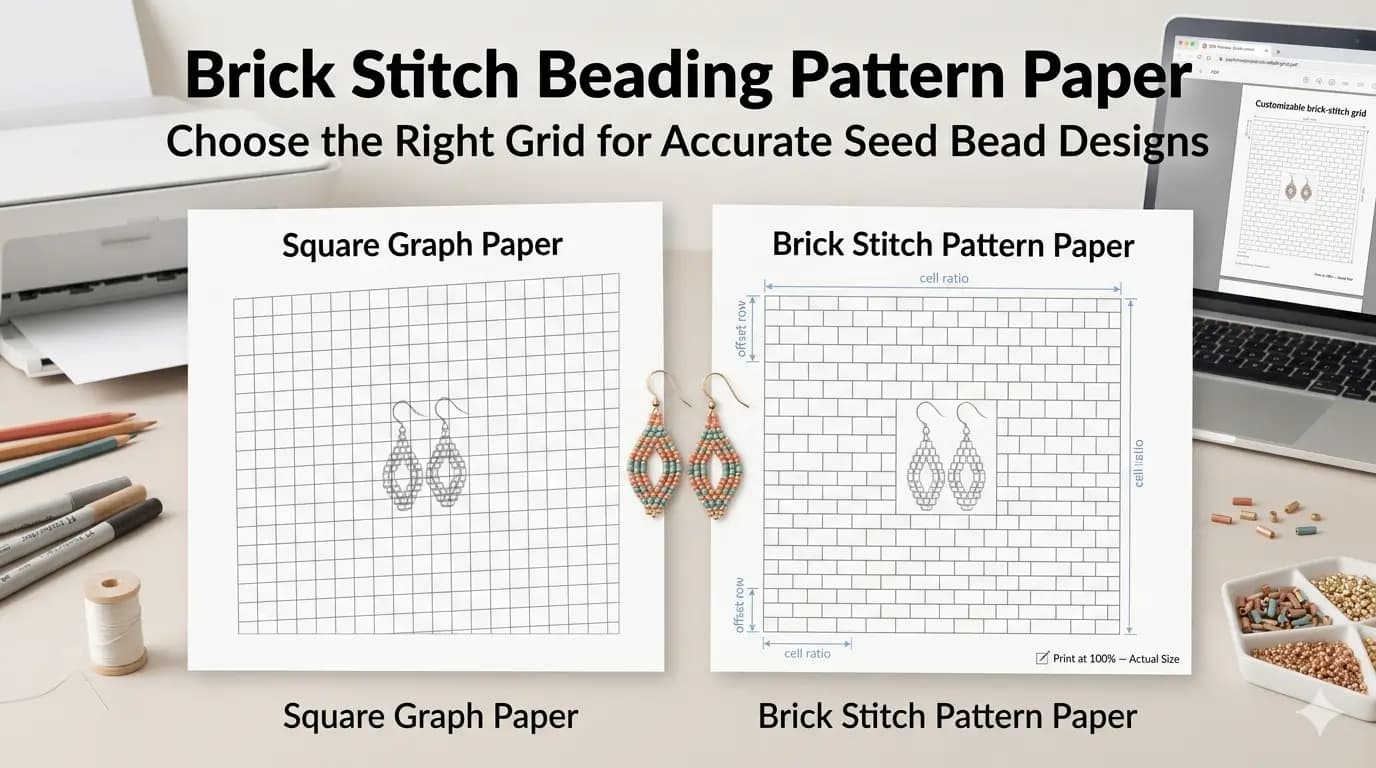
Standard square graph paper does not work well for brick stitch. Each row must align to the center of the previous row, not to a square corner. Dedicated brick stitch beading pattern paper shows that offset layout so your design preview matches the finished piece. Square cells force every motif onto a checkerboard. Circles become octagons, diagonal stripes stair-step the wrong way, and a pointed earring outline that looked symmetric on paper lands a half bead off once you start the second row.
Peyote stitch uses a similar offset, but the work usually grows along a different axis and the bead faces sit in a different orientation. If you reuse peyote paper for brick stitch without checking row direction, the motif can still look plausible in pencil and then lean once it is stitched. Use brick stitch paper when the piece is built row by row with that brick-wall stagger, and keep peyote charts for peyote. The paper is a map of how beads sit, not a square grid you can reuse for every stitch.
Matching Your Grid to Bead Sizes (Miyuki vs. Seed Beads)
The beads you use directly affect the aspect ratio of your template. Miyuki Delica cylinders (especially 11/0) are not perfect squares: they are slightly wider than they are tall. A true square cell previews a motif as taller than the stitched result. For Delica 11/0, start with cells that are a little wider than they are tall rather than 1:1 squares. The first pass does not need laboratory precision; it needs the drawing to match stitched width and height.
Classic round seed beads are fuller and more circular. Adjusting cell width and height for your bead type keeps proportions honest. Otherwise, a round-looking motif on paper can look squashed or stretched once it is stitched. Round 11/0 seed beads sit closer to a square cell than Delicas do, but they still vary by brand and finish. If you mix Delicas in the body with round seed beads in a fringe, chart the body on the Delica ratio and treat fringe length as a separate count, not as more of the same grid.
Larger beads such as 8/0 change both the cell size you want on the page and how many repeats fit in an earring or patch. Bigger beads need larger printable cells if you still want to color each bead by hand; tiny cells that worked for 11/0 become unreadable. Smaller 15/0 work is the opposite: you may print a denser grid so a small motif still has enough beads to show a face or letter, then stitch with a finer needle and thread. In every case, pick one bead type as the chart standard and note substitutions in the margin instead of redrawing mid-project.
If you already have a stitched swatch, measure a short run of beads with a ruler and compare that to the printed cells. Ten Delicas across should span a similar width to ten cells on the paper, and a stack of ten rows should match ten cell heights. A small mismatch is normal; a large one means the aspect ratio is wrong and the motif will distort. Adjust width or height in the generator and print a second test strip before coloring a full chart.
Best Layouts for Earrings and Patches
Brick stitch works well for fringed earrings, brooches, and small patches. Choose grid orientation from how the piece grows. Most earrings start from a ladder or a base row, then increase or decrease toward the fringe. A vertical template puts the hanging edge at the top of the page, so you can see whether the silhouette tapers, flares, or stays rectangular. Horizontal layouts are clearer for cuff bands and wider panels that you read left to right; a repeating 12-bead motif is easier to color as a strip than as a tall column. Patches and brooches sit in between: a small square or slightly portrait rectangle usually leaves room for the motif plus a one-bead border without wasting a full sheet.
Leave a fringe allowance on earring charts even if you will decide the fringe colors later. Mark the last solid row of the body, then add empty cells or a note for how many fringe strands hang from each bead. Fringe added after the fact often makes a balanced body too long for the ear wire or too heavy for the thread path at the top. For pairs, chart one earring and mirror it; a freehand copy of the second side rarely matches.
Small patches and appliqué pieces benefit from a quiet border of a single bead color so the motif does not unravel visually at the edge. Wide panels and wall hangings need a different density: more cells per page, lighter line weight, and a plan for how sheets tile if the design is larger than one A4 or Letter print. Number the sheets and overlap one row or one column so you can tape them without losing a bead in the seam.
How to Customize Your Printable Beading Paper
A generated template is more useful than a fixed notebook pad, because you can match cell size and page format to the project. Pre-printed beading pads lock you into one cell size and one sheet. Set these options before you color a full chart:
1. Cell density: Fit more cells per page for large motifs; use slightly larger cells for small, detailed earrings so color coding stays readable. If a cell is too small to hold a pencil fill plus a tiny letter for a color key, you will stop using the chart. If cells are huge, a 40-row earring spills onto a second page for no reason.
2. Line weight: Keep grid lines light gray so they guide your eye without competing with pencil or marker colors. Heavy black lines eat the colored area of each cell and make similar bead finishes harder to tell apart. A thin stroke, roughly in the 0.1–0.2 mm range on the printed page, is usually enough.
3. Color coding: Decide whether each cell gets a solid fill, a symbol, or both. Solid color is fast for a handful of bead finishes. Symbols or letters help when you have many close shades of blue or when you will photocopy the chart in grayscale. Leave a legend on the same sheet: letter, finish name, and bead size.
4. Page size and margins: Choose A4 or Letter to match the paper in the tray, then keep outer margins wide enough that the first and last columns survive typical printer non-printable areas. A chart that runs to the sheet edge will lose beads on the left or right. If you punch holes for a project binder, add extra left margin so the grid does not sit in the punch zone.
Printing Tips for Accurate Beading Templates
Before you print, turn off Fit to Page and use Actual Size (100% scale). Scaling even slightly distorts cell proportions and can throw off your stitch count. Brick stitch paper is only useful if a row on the page is still a row in the beadwork. A 4% shrink from Fit to Page is enough to make a measured Delica ratio look square again, which is the opposite of what you set in the generator.
For coloring designs, use paper around 90–120 gsm instead of thin copy stock. It reduces bleed-through, so marker and gel-pen ink is less likely to show on the reverse. If you only have 80 gsm copy paper, print single-sided and use a backing sheet while you color.
Print one test page and check three things before a full run: the offset still reads as a brick layout rather than a square grid, the cells are large enough to color, and the outer rows are not clipped. Then print the working copy. If you change bead size or switch from Letter to A4 mid-project, export a new PDF rather than stretching the old file. For driver-level print settings and A4 versus Letter scaling behavior, use the home printing guide linked among the related posts.
Counting Rows and Common Mistakes
When you move from paper to thread, count rows on the chart the same way you will stitch them. In brick stitch that usually means a starting ladder or base row, then each subsequent row offset by half a bead. Mark the start row on the print so you do not double-count it. For increases and decreases, mark the added or dropped beads in the cells themselves; a note in the margin is easy to skip when you are holding the needle.
The most common charting mistake is using square graph paper and hoping the stagger will not matter. It does: every other row is visually shifted, so any motif with a vertical centerline, a letter, or a face will drift. The second is printing with Fit to Page or a mismatched paper size, which quietly changes cell width and height. The third is coloring on a 1:1 square cell for Delica 11/0, then wondering why a circular motif became an oval. Fix the paper first; technique problems are easier to see on an accurate chart.
Keep the working chart next to the bead tray and tick off completed rows. On a wide patch it is easy to lose your place if you only glance at the colored picture. A printed grid with a marked start, a color key, and actual-size cells is the most reliable way to make the stitched piece match the drawing.
Design your brick stitch template
Match aspect ratio to your bead size and project type, then download a printable brick stitch grid built for your layout.
Open Beading Grid Tool